Chapter 17Modular Electronics
Electronics has changed over the past few years, and more and more people have an invention, but don’t necessarily want to learn degree-level electronics to make it a reality. Suppliers such as SparkFun, Seeed Studio, Pololu, and others support this by supplying modules and breakout boards that simplify the process of using complex devices. In addition, there are ICs for most of what you might want to do in electronics, and these will greatly simplify your project build. Also, there are whole systems, such as Arduino (see Chap. 13), .NET Gadgeteer, and Netduino, that provide plugtogether modules for pretty much anything that you might want to build that has a microcontroller at its heart.
17.1 There’s an IC for It
Although plenty of useful, general-purpose ICs are available, there are also some very specialized devices. Before designing anything complex from discrete devices, you should always check that you are not reinventing the wheel. There may be an IC that you can use that will reduce the component count and cost of your project.
Table 17.1 lists some of the ICs that you may find useful for your projects. Some of them are general purpose; others fill a very narrow niche. This is not intended to be any exhaustive list, but rather to provide inspiration. We have not listed part URLs. You can find places to buy components using the Octopart parts search engine (http://www.octopart.com), where you will also be able to track down data sheets.
17.2 Breakout Boards and Modules
You do not always need to start your design from scratch. Many ready-made modules and breakout boards are available to inventors to incorporate into their designs.
The difference between a breakout board and a module is often a little blurred. The intention of a breakout board is that it simply “breaks out” the difficult-to-access pins of a surface-mounted device (SMD) IC into 0.1-in connections that are much easier to use. However, breakout boards often add a few extra components like a decoupling capacitor, voltage regulator, or level conversion. So the point at which a breakout board becomes a module is a bit arbitrary.
Table 17.1 ICs for Electronics Projects
| IC | DESCRIPTION |
|---|---|
| Audio | |
| HT9200 | DTMF code generator, for use in applications such as phone
auto-dialers; easy connection to microcontroller |
| ICL7611 | Low-voltage, single power supply op amp |
| LM358 | Low-cost dual op amp |
| RTS0072 | Voice changer IC that distorts or transposes audio signals |
| ISD1932 | Voice recorder IC |
| SAE800 | Door chime generator |
| TDA7052 | 1-W audio power amp |
| TDA2003 | 10-W audio power amp |
| DG201B | Quad analog switch |
| Power Control | |
| L298 | Two-channel 2-A H-bridge motor controller |
| S202T01F | Solid-state relay, 2-A, 600-V |
| MAX1551 | Lithium polymer battery charger |
| L297 | Stepper motor controller |
| LED Drivers | |
| MAX6958 | 4×9 segment LED driver with I2C interface |
| LM3914 | Bar graph LED display driver (10 LED outputs, analog input) |
| LM3404 | 1-A constant current LED driver |
| Miscellaneous | |
| NE555 | Timer IC |
| DS1302 | Real-time clock, I2C interface |
| 24C1024 | 128 kbit×8 bit I2C EEPROM |
| SST25VF010A | 1-Mbit SPI flash |
Whatever you chose to call them, breakout boards and modules can be very useful in prototyping when you want to get something working to prove a concept using prebuilt modules, and then advance to a final design without the module.
There are many sensor modules (see Table 17.2), and some of these are covered in more detail in Chap. 6. Table 17.2 lists some of the more interesting modules that we have come across.
17.2.1 Radio Frequency Modules
Radio frequency (RF) electronics is a specialized part of electronics that is a discipline in its own right. At high frequencies, PCB layout becomes critical, and design is not as
TABLE 17.2 Some Modules and Breakout Boards
| MODULE | USAGE | SOURCES |
|---|---|---|
| RF Modules | ||
| I2C FM radio receiver | FM radio | SparkFun: BOB-10344 |
| 433/315-MHz transmitters/ receivers |
Data link between microcontrollers, sensors, and actuators |
SparkFun: WRL-10533, WRL-10535 Seeed Studio: WLS105B5B |
| Bluetooth | Microcontroller/cellular phone/computer link |
SparkFun: WRL-10269, WRL-10253 Seeed Studio: WLS123A1M |
| WiFi | Wireless network to microcontroller | SparkFun: WRL-10004 Seeed Studio: WLS48188P |
| XRF modules | Data link between microcontrollers, sensors, and actuators |
http://shop.ciseco.co.uk/wireless/ |
| XBee | Data link between microcontrollers, sensors, and actuators; medium range |
SparkFun: WRL-10414 |
| XBee Pro | Long-range data link | SparkFun: WRL-09085 |
| RFID tag reader | Security | SparkFun: SEN-08419 Seeed Studio: RFR101A1M |
| GSM modem | GPS tracking, telemetry | SparkFun: CEL-09533 |
| Audio Modules | ||
| Audio power amps | Driving speakers | SparkFun: BOB-11044 |
| MP3 encoder/decoder/ player |
Sound file playing | SparkFun: DEV-10628 |
| Microphone with pre-amp | Sound detection; sound recording or DSP | SparkFun: BOB-09964 |
| MIDI decoder | Musical instruments | SparkFun: BOB-08953 |
| MP3 player | Playing sound samples | SparkFun: BOB-10608 |
| Power Control | ||
| H-bridge | Bidirectional motor control | SparkFun: ROB-09457, DEV-10182 |
| Relay (wireless) | Wireless power control, home automation | Seeed Studio: WLS120B5B |
| Display Modules | ||
| LCD alphanumeric | 2-and 4-line by 16-or 20-character displays |
SparkFun: LCD-00255 Seeed Studio: LCD108B6B |
| LCD graphical | 128×64 up to 320×240 pixel displays, color and grayscale |
SparkFun: LCD-00569, LCD-10089 Seed Studio: LCD101B6B, LCD105B6B |
| OLED displays | Bright color displays | Spark Fun: LCD-09678 Seeed Studio: OLE42178P |
| LED matrix displays (serial interface) |
Large color displays and signs | SparkFun: COM-00760 (Continued) |
TABLE 17.2 Some Modules and Breakout Boards ( Continued )
| MODULE | USAGE | SOURCES |
|---|---|---|
| Sensor Modules | ||
| Humidity sensor | Weather stations, humidity control | SparkFun: SEN-10239 |
| Seeed Studio: SEN111A2B | ||
| Compass | Direction finding | SparkFun: SEN-07915 |
| Seeed Studio: SEN101D1P | ||
| Magnetometer | Measurement of magnetic field strength | SparkFun: SEN-00244 |
| Color sensor | Measurement of light color, for example in industrial control |
SparkFun: SEN-10904 Seeed Studio: SEN60256P |
| Temperature sensor | Digital thermometers and thermostats | SparkFun: SEN-09418 |
| Seeed Studio: SEN01041P |
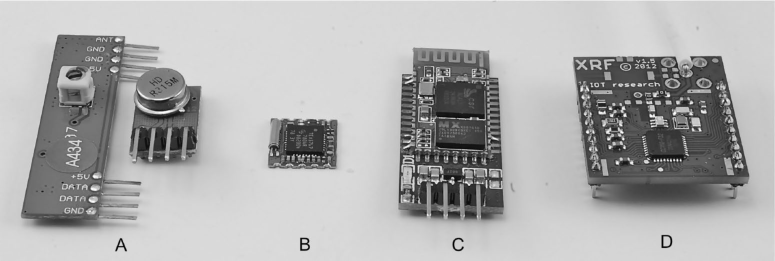
straightforward as with more typical analog and digital design. For this reason, you will often find ready-to-use RF modules that can either be soldered onto your own PCB as part of a bigger design or plugged into socket headers. Figure 17.1 shows a variety of RF modules:
A 433-MHz receiver and transmitter pair (A)
A TEA5767 FM receiver board (B)
A Bluetooth modem, which is actually one module on top of another, with the larger one providing level conversion (C)
An XRF wireless serial module that fits a standard XBee socket (D)
These represent just a small subset of the wide range of RF modules available to the inventor (see Table 17.2 for a more complete list).
433-MHz and 315-MHz Modules
The 433-MHz and 315-MHz modules (Fig. 17.1A) are very low cost. They find their way into all sorts of consumer electronics requiring remote control, such as wireless door bells, remote car unlocking, smart meters, and remote-control toys.
RF modules
The data rates are generally low (8 kb/s is usually the top end, and 2 kb/s is quite common), but power consumption is also low. Their maximum range is normally about 100 yards, but can be much less indoors.
These modules are usually separate transmitters and receivers, rather than a combined transceiver, and so they are generally used in situations where data is flowing in only one direction.
Bluetooth Modules
Bluetooth modules provide a great means of interfacing your electronics to a mobile phone. The module in Fig. 17.1C is actually a basic 3.3-V Bluetooth module designed to be surface mounted onto another board. In this case, it is mounted on a level changing board that allows the module to operate at 5-V TTL serial levels, but 3.3-V modules like this often find themselves incorporated into products. Again, economies of scale mean that these modules can be bought for just a few dollars if you look around.
XBee Modules
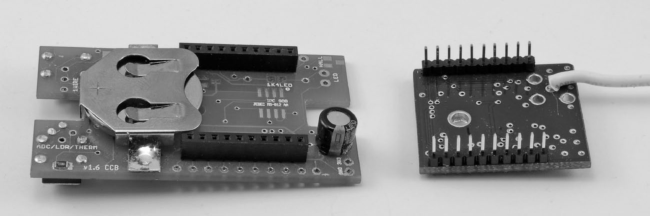
XBee is a proprietary standard of Digi International, but the sockets have been adopted for a range of radio link modules from many manufacturers. These modules, such as the XRF module from Ciseco Plc (see Fig. 17.2), act as a transparent serial interface between two devices. For example, one of the devices might be an Arduino with an XBee socket shield with an XRF module installed communicating with a lowpower remote sensor with an XBee socket and another XRF module, as shown on the left in Fig. 17.2.
XRF radio module and wireless temperature sensor module
FIGURE 17.2
GSM/GPRS Modem Modules
The GSM/GPRS modem modules are essentially cellular phone modules that provide most of the features of a cellular phone, including sending Short Message Service (SMS) text messages and Global System for Mobile Communications (GSM)/General Packet Radio Service (GPRS) data. Serial commands are sent to the module from a microcontroller to control its operation.
17.2.2 Audio Modules
Although audio electronics is not as difficult as RF electronics, you still need to be careful to avoid earth loops and the dreaded 60-Hz hum that all too easily finds its way on to the signal path given half a chance.
Audio power amp module
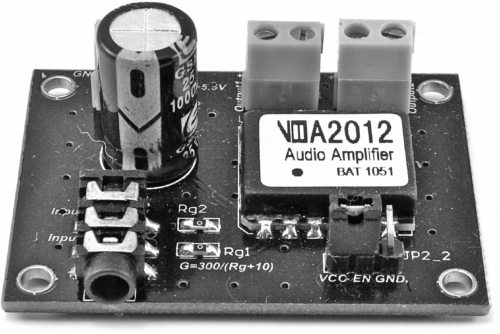
You will find a good selection of audio amplifier modules such as the class D amplifier based on the XMA2012, which is a 2 × 3 W power amp IC (see Fig. 17.3).
This kind of module is very convenient, as it comes with screw terminals for power and speakers and a socket for audio input. Economies of scale make the cost of such modules low.
As well as power amp modules, you will also find audio modules for pre-amps, MP3 players, MIDI interfaces, and tone controls.
17.3 Plug-and-Play Prototyping
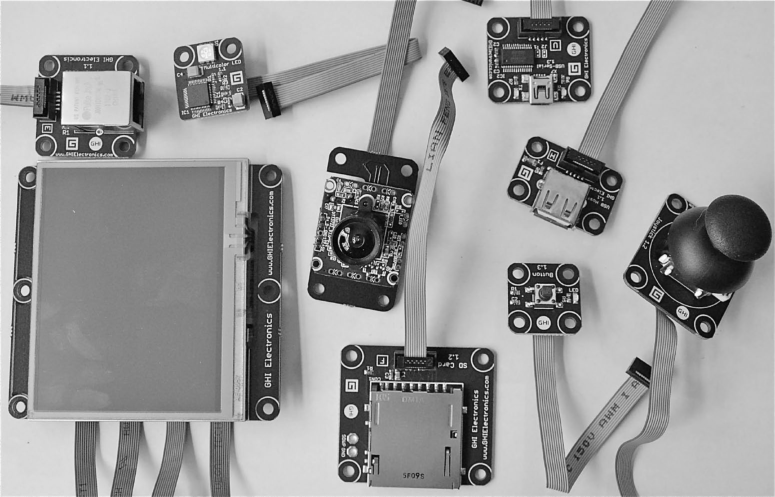
When taken to its extreme, the modular approach can result in a system such as .NET Gadgeteer that allows complete plug-and-play development of a prototype (see Fig. 17.4). This system is based on attaching a wide range of sensors and other modules to a microcontroller main board using plug-in cables.
The .NET Gadgeteer system
Connecting modules in Visual Studio
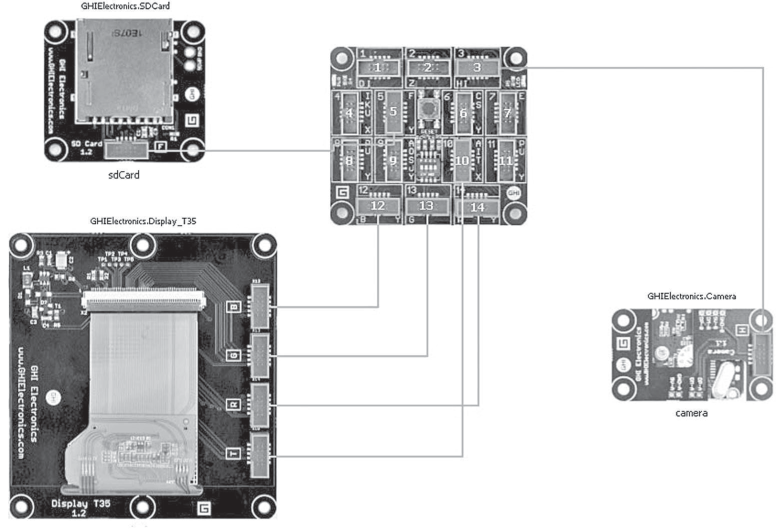
.NET Gadgeteer is programmed using Microsoft Visual Studio. When used with .NET Gadgeteer, this IDE includes a graphical editor that generates much of the boilerplate code, simply by connecting modules in the design window (see Fig. 17.5).
New modules for the .NET Gadgeteer are being developed all the time. The following are most of the modules available at the time of writing:
Accelerometer
Barometer
Bluetooth
Buttons
Camera
CAN (vehicle engine management unit)
Cellular radio/GSM/GPRS modem
Compass
Current measurement (for smart meters and energy monitors)
Display, touch screen LCD
GPS
Gyroscope
Joystick
LED, multicolor
Light sensor
Moisture sensor
Motor driver
MP3 music player
OLED display
Potentiometer
Pulse oximeter (heart pulse rate measurement)
Relay
SD card
USB interface
Video output
Wi-Fi
XBee
The module manufacturers also supply main boards of different sizes and specifications. For up-to-date lists, see the websites of the main suppliers of .NET Gadgeteer hardware: GHI Electronics, Seeed Studio, Sytech Designs, and DFRobot.
If you want to learn more about using .NET Gadgeteer, the book Getting Started with .NET Gadgeteer by Simon Monk (Make, 2012) is a good place to start.
17.4 Open Source Hardware
Open source software has been with us for many years now, but open source hardware is a relatively new concept. The term open source really applies to the design files for the hardware, and means that the schematic and PCB design are made publicly available (usually in EAGLE CAD format). The implications of this are that anyone is free to take those design files and produce their own boards using the design. Often, the originator of a new piece of open source hardware will also manufacture the boards and sell them directly or through distributors. The originator will generally be known in the community, and these will be considered to be the “original” boards and therefore the most valuable. Copies and clones may appear if the design is successful, but the original boards are likely to remain the most used.
Perhaps the most successful open source hardware design is the Arduino (see Chap. 13). All the Arduino boards and most of the shields available for the Arduino are released under an open source or creative commons license. Other well-known open source hardware projects include the following:
BeagleBoard A single-board computer
MIDIbox MIDI music hardware
Monome A button and LED grid for controlling virtual synthesizers
Ultimaker, RepRap, and MakerBot 3D printer designs
Chumby An embedded computer
Open EEG A medical device
There are also many small modules that are released as open source designs.
So, why would anyone want to give away their ideas for free for the world to use? Well, for one thing, many creative people make things for the fun of making them and not to get rich. There is a world of difference between having a good idea and building a business. If you want people to see and use what you have done, then why not release it into the wild? As with open source software, there are also opportunities for businesses to develop with the so called “halo effect,” providing consultation and support for the hardware.